A Low-Buy Makeover: Reworking My Sun Porch for Less Than $150
- Lauren Figueroa

- Jul 25, 2025
- 7 min read
Updated: Aug 6, 2025

Last week was the first week in a long while that I had some time and space alone in our house. After an appointment early in the week, I decided to make an impromptu stop at our local Re-Store Thrift Shop (which if you don't know about these gems, they are the Habitat for Humanity thrift stores), and BOY did I hit the jackpot!
They were having an "all lamps $10/each" sale, which, if you know me, I LOVE lamps. It's often slim pickings for lighting at thrift stores, but I ended up finding four high quality lamps WITH really nice shades—one was even marked five bucks!—so all in I spent $35 for four really nice lamps. Mind blown? YES.
Then I came across these funky little benches that I couldn't stop coming back to. At first I thought, nah, these are weird...I think? But the more I looked at them, the more a vision came together in my mind.


For a long time, Larry and I had talked about having a built-in type dining situation on our front porch; I had a hunch that these would be ideal for that. The fabric was in perfect shape and the wood was a really pretty natural oak. When I asked how much, the kind lady at Re-Store said "How about $30/each. Plus it's $30% off all furniture today!" $42 bucks for two nice solid benches? YES PLEASE. I figured I could use them elsewhere or sell them if they didn't work out.
The Porch Before: Why I Decided on a Makeover
So first up, let me talk about the porch before, and why I was inspired to change it up in the first place.
We had this cute little cafe table and chairs in the window (below) that we got from my parents for our wedding. It has followed us from home to home, and I really love this set - it's solid, neutral, and super versatile. But we never sat at it in this location, possibly because it was hard to get in and out of.

Second, the "day bed" (which is, literally, a bed) was another location that, aside from Ruby, we never used. It was awkward to sit on because the pillows would fall down behind the bed, and it was on one of those rolling metal bed frames, so it wasn't super stable, which felt uncomfortable. I was also feeling over the artwork, which wasn't ever something I'd personally connected with—really more of a space filler

I always say that you can tell good design by whether or not a space gets used (for example, a space might be super cool looking, but if the sofa is uncomfortable, you'll never sit on it). So my motto? Function first, but make it cute.
Other than that, I figured I would keep the sofa, armchair, and desk, because those are three elements of the porch we actually use regularly.
Arranging the Furniture
First I took the cafe set off the porch and moved them into the dining room for safe keeping. I tried the benches in a few different configurations on the windowed end of the porch, but nothing was fitting quite right, and I didn't like that the backs of the benches would block any of the windows.
Then I realized that the benches fit almost perfectly across the depth of the sunroom, and that sparkled a new idea—what if I flip flopped the location of the day bed and the cafe area?
I didn't want the bed to block the windows either, but I measured the height of the boxspring and mattress without the frame, and it was EXACTLY the height of the bottom of the windows. I love it when things are meant to be!!
I took the bed apart, removed the bed frame, and slid them over to their new home. The bed was about 10 inches short of the depth of the sunroom, and I preferred the gap on the wall side vs. the window side, so I'd still need to figure out what to put in that space.


In the meantime, I put the two benches side by side along the back wall of the sunroom, and they fit soooo perfectly! In front of them, I placed the cafe table with the two chairs, which gave us 4-5 seats if we ever wanted to have a group out here for games/drinks/hangs, and it really opened up the space as a whole because the cafe area takes up much less floor space than the bed. I also repurposed the rug that was already below the bed in the cafe area.
In order to fit the bed in it's new location, I needed to slide the desk and sofa over just a handful of inches. This caused some problems because the outlet box sticks out of the wall, and the desk needed to be in front of it to fit now. I wasn't loving how crammed it felt with the desk, and now that I had the cafe area, which could double as a work zone, I didn't necessarily have a need for a desk out there.


I decided to swap the desk for this little vintage table that we'd previously had in our entryway at the Madison house, and had most recently been holding laundry supplies in our basement.
Being about a foot shorter in length, it worked out super well beside the sofa, and also allowed me to better access the outlet for a lamp.
I'd previously had a set of stools on the porch as well: two stored at the foot of the daybed and one beside the sofa functioning as a side table. When I eyed the gap between the daybed and the wall, I thought... hmmmmm... those juuuust might fit there! And low and behold...

PERFECT FIT! I lined them up sort of like a console (ideally I'd have a single piece here, but I wanted to work with what I had), and decided they would be home to our blue tooth speaker, as well as a lamp, which would light up both the daybed and the sofa for reading and general coziness.
Lastly, the sofa, armchair, larger area rug, and vintage trunk remained in approximately the same locations as before.
A Vienna-Inspired Gallery Wall
Now that I had the furniture in place, it was time to figure out some art and decor.
Last June, I went on a very special trip with one of my besties to Vienna, Austria for a week. While we were there we amassed a collection beautiful post cards, many featuring famous artworks we'd seen and the beautiful palaces we'd toured on the trip. I decided to pop over to the Salvation Army to see if I could find some good frames to do a Vienna-themed gallery wall.

When I first went through the frames, I only found a couple, but as I kept culling through the piles again and again, I ended up walking away with 15 or so really fantastic (and SUPER cheap) frames. Many of which had really nice matting inside—I was so pumped!
Quick Tip: Don't let dirty glass deter you from a frame. Most of my thrifted frames were only dirty on the glass. Inside the frames, all the mattes were in great shape, and a quick spray with glass cleaner made them look like new. I especially love to find solid wood frames...such nice quality!
I spent a few hours framing all the post cards and coming up with the gallery arrangement. Then, I made a template of the gallery wall by tracing the layout of the frames onto large pieces of packing paper, noting the location of the nail hole for each one. This is a semi-fail-safe way to hang them in the exact spots you planned! Simply tape the template up on the wall, hammer the nails into their places, and peel back the template.


My only issue was that, once I got it on the wall, it felt a little top heavy. I ended up improvising a bit and and adding/rearranging a few of the frames.
In the end, I was super happy with the result! I've never done a themed gallery wall before, and I loved this particular concept because, as my friend Sammy observed, "I like that it's subtle—it doesn't scream, THIS IS VIENNA!"
I think when working with themes, maybe subtly is key...although I can appreciate a kitschy in-your-face theme sometimes.
Perhaps subtly is simply my own preference!
Accessories and Finishing Touches
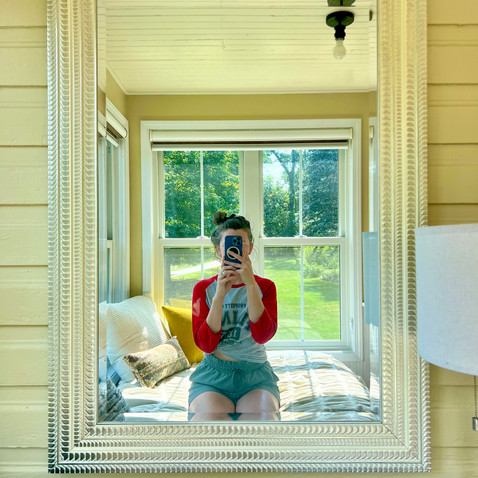
I decided last minute to hang a large mirror in the space above the daybed and it turned out to be a fantastic decision! Now, when you sit on the day bed, it feels like you're surrounded by windows on three sides. It's suuuuper dreamy.
On the antique table beside the sofa, I popped a potted plant and one of the lamps I found at Re-Store, along with a ceramic bowl that I already had. Behind the lamp on the wall, I hung a sweet floral frame I found at Salvation Army that houses a postcard from our favorite restaurants in Charleston, South Carolina.


In the cafe area, I draped a striped throw blanket (thrifted!) across the top of the two benches to give the illusion of it being one long piece. I also popped a long velvety bolster pillow I'd found thrifting onto the center of the bench. There are a few other red-ish accents throughout the space (the lamp beside the sofa/some elements of the artwork/the larger rug), and I love how the pillow ties in those elements.
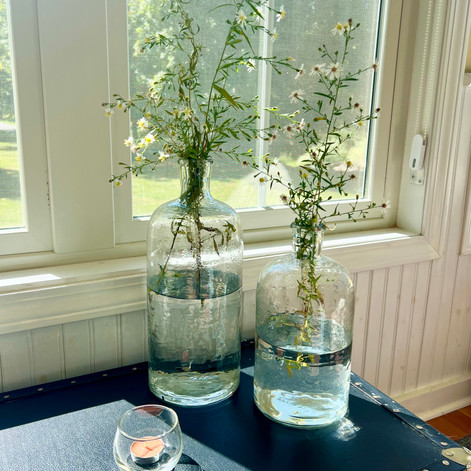
Finally, I stole a couple potted plants from around the house to fill out the cafe area and added a handful of accessories (most reused from the existing space) including a stack of books, a small saucer with a collection of rocks from around our property, some large glass bottles to hold stems/flowers, and some candles for vibes/coziness.


The Wrap Up
This personal project reinvigorated my desire to help folks figure out how to make their home special AND function for them, even if their working on a very small budget. I probably spent less than $150 all in (plus maybe 8 hours of work) to give this space a fun new spin. This is what I'd call a low-buy makeover. I shopped my house, I thrifted, and I literally just PLAYED.
Play is such a big part of the design process—as you do it, you begin to feel what works for you and what doesn't, you learn what you like to look at, you make discoveries, and you begin to feel a deeper connection to your space.
A no-buy or low-buy makeover is absolutely something we could work on during a Designed in a Day Session, so if you're worried about the fact that you'd like to work with what you already have or supplement with a few thrifted finds, NO worries at all! I love the creativity and resourcefulness that arises when you have a container like that to work within. If that sounds fun to you, this is the best pace to start ☺️
Do you have and example of your own low-buy makeover? What discoveries did you make along the way that you didn't "plan in advance"? Share them with me below!


I used to play similar arcade games, but this Block Breaker online one feels cleaner and more polished. The ball movement and bounce angles are consistent.
I enjoy how Drift Boss doesn’t rely on complicated mechanics. It’s just you, the track, and your ability to stay in control under pressure.
I recently discovered a very useful mouse testing website that can check the condition of your mouse scroll wheel through scrolling tests. If you want to see whether your mouse is damaged, you can try Polling rate test
The sun porch makeover for under $150 is genuinely inspiring, demonstrating that resourceful design can achieve stunning results without breaking the bank. It's the kind of clever transformation that would make any budget-savvy Cartoonperson cheer.
Surah Yaseen is often called the heart of the Quran because of its powerful message about faith, accountability, and Allah’s mercy. Surah yaseen reminds believers of the truth of resurrection and the importance of following divine guidance. Its verses bring comfort to the heart, strengthen iman, and encourage reflection on life and the hereafter. Reciting it regularly nurtures patience, hope, and trust in Allah’s wisdom.