Our $1,000 Guest Bathroom Makeover | Grand Rapids Home Tour Part 10
- Lauren Figueroa Interior Design
- Oct 29, 2018
- 3 min read
Updated: Apr 11, 2023
This home tour series has been so much fun—I've loved sharing my favorite place with you—and it's hard to believe we've arrived at our final post!
Kudos to you if you've stuck with us for the whole tour, and of course, all the previous posts are available on the blog if you missed one. Just search "Grand Rapids Home Tour" and you'll find them.
BEFORE / AFTER

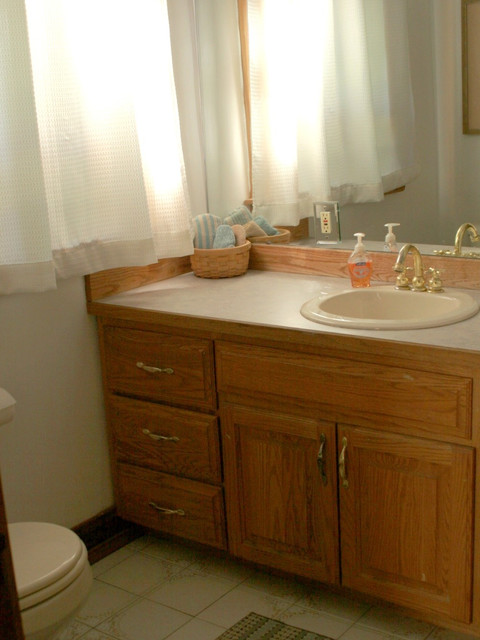


This last space is an exciting one to share because this is the room in which we've done the most major of updates. This room was surely the MOST dated space in our house, from the brassy faucet, to the honey oak cabinets, to the teal formica countertops. Oh, and lets not forget the floral beige tiles and ALL beige fixtures. UG.
Lets take a little journey through our updating process...
Here's a HORRIBLE before photo...

My plan for this update was to do it as cost-effectively as possible. I planned to keep the vanity and paint it, lay wood-look LVP over the linoleum, paint the walls, replace the toilet, update the lights, and update the counters/sink.
This below image is just after painting the cabinets. I used Lowe's furniture paint, which is super easy to use (no sanding necessary!) and it seems to be holding up well.
I ended up going a little lighter on the cabinets than I originally intended, but overall I'm happy with it. I may go one or two shades darker after I live with it for a little while. I also swapped out the brass hardware for updated blackish bronze ones (which I actually had laying around from another house project).

Next up was countertop installation with our friend Paul at Styles Stone Design (highly recommend!). We went with a slightly off white quartz that has these beautiful flecks of grey beige, and we updated the sink to a white under-mount fixture for wayyy easier cleaning.

The next photo one was just after getting the flooring installed. We went with a wood-look luxury vinyl plank (LVP) from our friends over at Complete Flooring and Interiors, which we laid right over the tile (some leveling was required).
We wanted something that would tie in with our brighter wood trim, but that wouldn't look like we went all matchy-matchy. The team at Complete Flooring also swapped out our ugly beige toilet for a shiny new white one.

And lastly, my super cool hand-dandy father (an electrician by trade) helped us hook up our plumbing fixtures and swap out the old light fixtures (I was a pretty darn good assistant, if I do say so myself). Here's a shot of him in action:

You might not be able to tell from the photos, but we also updated the wall color. It was just a little too stark white before, so I went for something with juuuust a touch more tone to it.
The only element we didn't end up updating was the tub and the tile surround.
We did swap out the old brass shower head for a new chrome one, but the tub and tile are in decent shape, and while I'd love it to match, we weren't quite ready to put the money into it.
We may have the tub and tile glazed white at some point in the future, but for the time being, the shower curtain stays shut, so guests are none the wiser.
Overall it was a super economical update. We spent just over $1,000 all said and done (granted, being a designer, I do get to cash in on some favors when it comes to working with vendors on my own house—score!).
Plus, we saved a ton by not ripping out the original flooring, keeping the tub, and reusing the cabinetry.
So take a look at the finished project! (I'll admit the photos didn't turn out the greatest...I went rogue on this one and shot them myself...!)
THE GUEST BATHROOM 2.0


Work with Lauren Figueroa Interior Design
LFID is a full-service interior design firm serving West and Southeast Michigan. We work with clients from Detroit, to Grand Rapids, to Holland, to Traverse City, and anywhere in between, and we pride ourselves on creating bespoke, people-centered spaces—because after all, people are what this life is all about!
If you have a project on the horizon, get started by telling us a little about your vision here, and you can view past projects here. Thanks for stopping by!


Comments